Rendering Caustics
Reflective Caustics
We can see above how with a reflective material (metal here), the more concave the shape gets, the more the light is concentrated, and the more complex and apparent the caustic pattern gets as it layers up in a tighter area on the ground plane. Convex shapes (far left) splay the light rays out, so there’s just a faint glow at the base of the object.

Color
Certain Hue colors will naturally reflect more light than others, so we’ll want to make sure to compensate with lower saturation values and higher reflectivity (IOR) with darker colors.
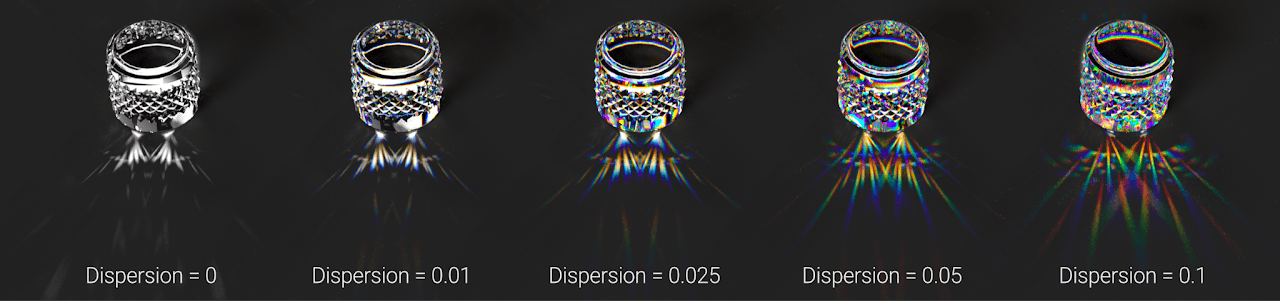
Dispersion
Dispersion is a natural phenomenon that occurs when the various wavelengths that make up visible light interact with a transmissive object. This splitting causes different colors to appear which then translate to the caustics, making for some pretty dramatic effects.

Light
The sharpest possible shadows and caustics would occur with a parallel light, where all the rays are emitted in exactly the same direction.
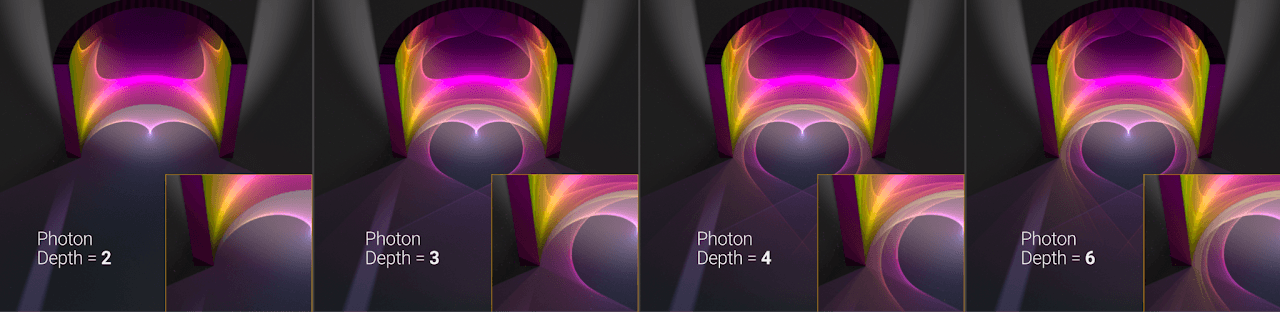
Photon Depth
Similar to the Diffuse, Specular and Scatter depth, this has to do with how many bounces through different materials the photons will travel before they go extinct.
Workflow
Place objects in the scene - use real-world scale whenever possible, think about how the objects will either reflect or refract light. For refraction, vary the wall thickness or shape thickness. Also think about the surface the caustics will appear on and leave room for the patterns.
Environment: Set up a basic environment like an HDRI, and turn the power way down (0.1 or 0.2 to start). If no environment is needed, set the default environment in settings to black.
Materials: Build and apply materials for the casting objects. These are reflective or refractive, allowing as much light to bounce off of or travel through as possible - so light colors, very little if any roughness. Turn on Allow Caustics in the IOR channel. Unless you have stellar hardware, don’t turn on Dispersion until later in the process. For receiving objects, matte, darker materials work great, or add roughness to reflective ones.
Lookdev settings: Switch to the Photon Tracing Kernel. Set max samples to 256 to start (more if you have better hardware). Up the specular depth to 24 if a lot of refraction or reflection is in the scene. Set GI clamp to 10 (or possibly 1 if it doesn’t affect the look). Set the gathering radius to 0.005, count multiplier to 8 (if the card has enough VRAM), gather samples to 8.
Lights: Set up area lights to produce caustics. Use a distribution (gobo/spotlight/etc) to restrict the light to the casting objects. Turn off surface brightness for more control of the light power. Smaller lights produce sharper caustics. Closer lights produce larger caustic patterns, but can cause blurriness or distortion. Further lights need to be a lot more powerful to reach the object. Move the lights around and test out different sizes and angles - little changes make large differences here. Adjust environment as needed.
Tweak time! To sharpen the patterns, change the light size & distance, and the gathering radius. To speed up renders at the cost of noise, up the gather samples. Change the shape/bevel/size/location of reflective objects and the IOR and wall thickness/shape of refractive ones to alter the pattern. Play with material colors to increase brightness/look of patterns. Now is the right time to turn on Dispersion if desired. For complex scenes with a lot of bounces, try higher photon depths.
Final settings: Up the max samples to 4096. Lower if the scene resolves quickly, raise it if the caustics are more complex and need more passes. If the scene is super caustics-heavy, leave the count multiplier at 8 - if not, reduce it to balance caustics and the look of the rest of the scene. Make sure the photon depth is high enough so detail isn’t lost. Find the sweet spot for gathering radius. For sharp caustics, this will probably be in the 0.001-0.005 range. Softer caustics will probably be in the 0.01-0.09 range. Bring the gather samples down to 2, experiment between 2-16 to find a good balance between render time and noise. See if changing the photon exploration strength to 1 does anything. It probably won’t. Turn on the denoiser if needed, and get enough max samples going so the denoiser doesn’t destroy fine patterns.
Description: A caustic simulation in Cinema 4D
Interface designer, Art Director at AppDynamics (16'—20'). Creative Director in BioTech (20' — Present).